Here at EchelonMC we want to ensure you receive all the information about all of our features that are available to everyone without a paywall. Please use the directory below to learn about each feature!
Our Currencies
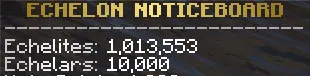
Within EchelonMC you will notice three main currencies that carry most of the server economy.
Echelites
Echelars
Echevent Tokens
Each currency has its own purpose, and each one can be earned through server systems. Echelites are the normal day-to-day currency. Echelars are the account upgrade and cosmetic currency. Echevent Tokens are long-term event rewards that unlock special perks and reward packs.
You will also see activity currencies in certain features, such as Farmers Coins, Gopher Points, and Vote Points. Those are tied to specific activities and usually feed back into the main economy instead of replacing it.
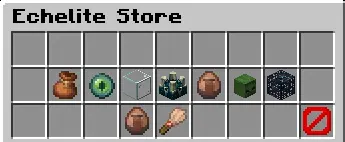
Echelites
Echelites are the everyday currency of EchelonMC.
This is the currency you will use the most. It touches survival progression, player trading, land ownership, teleports, graves, market listings, NPC services, and a large part of the Echelite Store.
If you are new, the simple way to think about Echelites is this:
Use them to build your base and protect your land.
Use them to buy quality-of-life unlocks.
Use them to trade with other players.
Earn them constantly while playing normally.
Echelites are intentionally spread across many systems so there is no single required grind. You can mine, build, fish, sell items, vote, complete achievements, trade, run event content, or sell to other players.
Earning Echelites
You can earn Echelites from a lot of normal gameplay.
Breaking blocks can randomly pay Echelites, and placing blocks can also reward you. Fishing can pay different Echelite ranges depending on whether you catch fish, junk, or treasure.
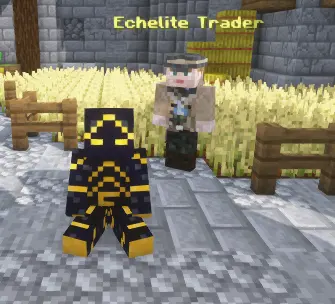
The Echelite Trader is one of the biggest direct earning routes. You can sell many materials, crops, and mob heads for Echelites. The trader has hourly favored items, which means some items are worth their full value while non-favored items pay a reduced amount during that hour.
The Sell Wand also uses the Echelite Trader pricing, which lets you sell valid chest contents without manually moving every stack.
You can also earn Echelites from:
Vote Boss rewards.
Vote Party Echelite packs.
Discord invite rewards when linked.
Echelar rank-up bonuses.
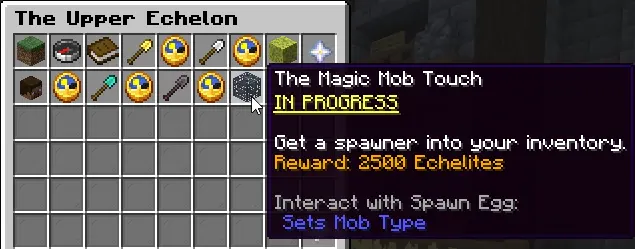
Upper Echelon achievement rewards.
Great Harvest prestige rewards.
Echevent reward packs.
Market sales and player payments.
Spending Echelites
Echelites are spent across the main survival loop.
The Echelite Store includes unlocks like Bagalon Bundle, Set Home Slot, Echeload, Mob Decapitator access, Got Glass?, Magic Mob Touch, Sell Wand, Infinity Villager, and Lobby NPC Shop access.
Land claims also use Echelites. You spend them to claim land, renew claim ownership over time, teleport to claims, teleport to public chunks, and pay for certain protections such as creeper explosion protection.
Other common Echelite costs include:
Teleporting back to graves.
Random teleport distance pricing.
Creating a team.
Teleporting to a team home.
Buying from player market listings.
Posting or filling Echelon Market buy offers.
Sending money to another player with /pay.
Echelites are meant to move between players too. Selling items, listing market goods, filling buy offers, public chunk teleports, and direct /pay transfers all keep the currency moving.
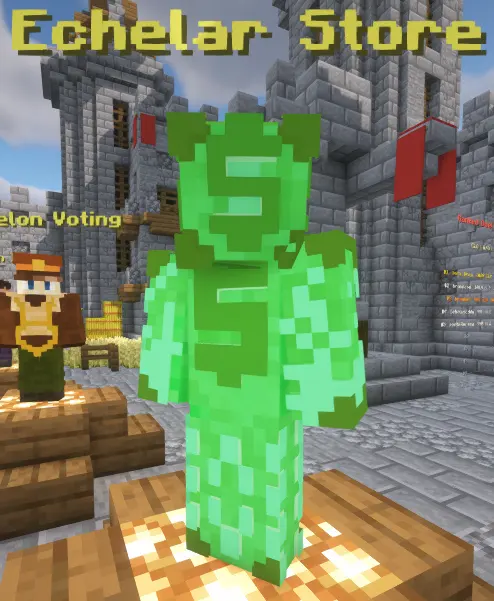
Echelars
Echelars are the account upgrade and cosmetic currency.
Echelars are used for the Echelar Store side of the server. They are connected to rank upgrades, pets, skins, particle effects, custom NPC looks, and special cosmetic-style unlocks.
You can get Echelars from donations, events, Echelar reward packs, certain staff-approved bug reports or suggestions, and player-to-player transfers through /pay. Echevent Rewards can also turn Echevent Tokens into an Echelar Pack, which grants a small random amount of Echelars.
Echelars are not the currency you spend on normal blocks, claims, market trades, or grave teleports. They are meant for longer-term account upgrades and visible customization.
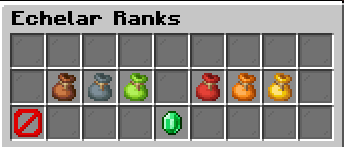
Echelar Ranks
Echelar ranks are bought as upgrades, and the server charges the difference between your current rank value and the rank you are upgrading to.
The rank path is:
T1 at 10 Echelars.
T2 at 25 Echelars.
T3 at 50 Echelars.
T4 at 100 Echelars.
T5 at 200 Echelars.
T6 at 500 Echelars.
Ranks can unlock account benefits such as extra SetHome slots, Echelite bonuses, /nick access, spawn flight or double jump, vote point bonus chances, and spawn hologram name displays.
The higher ranks also improve the chance for doubled vote points. T3 starts that bonus, and T6 has the strongest chance.
Spending Echelars on Cosmetics
Echelars can also buy visible and personal upgrades.
Pets include options such as Ronnie, Ralph, Susie, Jack, and Top Dog. Some pets are free, while others cost Echelars.
The skin shop lets you buy NPC-style skins. Most skins have a simple Echelar price, while some special NPC skins cost more.
The particle shop includes colored trails such as white, golden, red, orange, yellow, lime, green, aqua, cyan, blue, pink, purple, and rainbow trails.
Custom NPC options also use Echelars, including EchelonEddy and a Your Own Skin option.
These purchases are separate from Echelites so normal survival money and account cosmetics do not compete for the same wallet.
Echevent Tokens
Echevent Tokens are long-term event reward tokens.
They are earned from event-style progression and are spent in the Echevent Rewards menu. Unlike Echelites, they are not a normal trade currency. They are meant to feel more like a special reward you save up and spend carefully.
You can earn Echevent Tokens from:
Completing Parkour ladder runs.
Prestiging in The Great Harvest.
Buying one from the Gopher Shop with Gopher Points.
Weekly Weekend Event rewards.
Great Harvest prestige is an important source because it resets that event progression while giving you scaled Echelites and one Echevent Token.
Spending Echevent Tokens
Echevent Tokens are spent in the Echevent Rewards menu.
Current reward paths include:
Better Harvest for 1 Echevent Token. This lets you right-click harvest any crop.
Tree Harvest for 1 Echevent Token. Breaking a naturally spawned tree log can bring down the full tree, with durability and hunger costs applied.
Bigger Echelite Pack for 1 Echevent Token. This gives a larger random Echelite reward.
Echelar Pack for 2 Echevent Tokens. This gives a small random Echelar reward.
This makes Echevent Tokens useful even if you mainly care about Echelites or Echelars, because they can turn event progress into main-economy rewards.
Activity Currencies
Echelites, Echelars, and Echevent Tokens are the main currencies, but some features have their own activity wallets.
These activity currencies are usually earned and spent inside one feature. They give that feature its own progression without flooding the main economy too quickly.
The most important activity currencies are:
Farmers Coins for The Great Harvest.
Gopher Points for Gopher fetch tasks.
Vote Points for voting rewards.
Farmers Coins
Farmers Coins belong to The Great Harvest.
You earn them by working through the harvest world economy, including harvesting crops and selling harvest materials. Wheat and hay bales have direct sell paths, and the Great Harvest progression uses Farmers Coins to buy event perks and upgrades.
Prestige is the big reset point. When you prestige, your Great Harvest world progress, harvest inventory, perks, current Farmers Coins, and total earned Farmers Coins reset. In exchange, you receive scaled Echelites, one Echevent Token, and a stronger Farmers Coins multiplier for future runs.
Echevent Tokens and purchased Echevent perks are preserved through Great Harvest prestige, so long-term event progress is not wiped out.
Gopher Points
Gopher Points belong to the Gopher task system.
The Gopher gives timed fetch tasks in the main Echelon world. A task asks for a specific item, and when you complete it, that item is consumed and you receive Gopher Points.
Normal tasks include materials such as dirt, logs, redstone, lanterns, chests, beds, ice, and other fetch items. Rare tasks can be unlocked later and include higher-value requests.
You can spend Gopher Points on:
Task rerolls.
A Half Cost Reroll unlock.
More Time.
Rare Tasks.
Echelite Packs.
Echevent Tokens.
This makes Gopher Points a flexible bridge currency. You can use them to improve the Gopher feature itself, or convert enough effort into main-event rewards.
Vote Points
Vote Points come from voting for the server.
Each voting site can grant Vote Points, and Echelar rank bonuses can sometimes double the points you receive. Voting also helps the server-wide Vote Party, which unlocks bonuses at shared milestones.
Vote Party rewards include break Echelite multipliers, place Echelite multipliers, Echelite Packs, and Vote Boss progress.
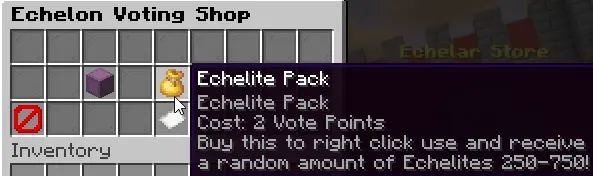
Vote Points can be spent in the voting shop on rewards such as:
Echelon Boxes.
Echelite Packs.
Chunk teleporting unlocks.
Voting is one of the easiest early-game habits because it can feed your personal wallet while also helping everyone progress toward global rewards.
Quick Summary
A simple way to remember the currencies is:
Echelites are for survival progression, land, teleports, stores, market trades, and player economy.
Echelars are for account upgrades, ranks, cosmetics, pets, skins, trails, and custom NPC options.
Echevent Tokens are saved from event progress and spent on event perks or reward packs.
Farmers Coins, Gopher Points, and Vote Points are activity currencies that support specific feature loops.
If you are new, focus on earning Echelites first. Once you understand the normal economy, Echelars and Echevent Tokens will make more sense as long-term goals.
Dueling
Dueling is the official PvP system on EchelonMC.
Normal player-vs-player combat is not meant to happen randomly in the world. If two players want to fight, they do it through a duel. This keeps PvP intentional, trackable, and much safer for normal survival gameplay.
There are two duel modes:
Ranked
Casual
Ranked duels use a controlled loadout and affect ELO. Casual duels use the players' current inventories and only track casual kills and deaths.
Starting A Duel
To challenge someone, right-click an online player with an empty main hand.
This opens the Player Options duel menu. From there, you can choose Ranked or Casual.
A duel cannot start if:
You try to duel yourself.
Either player is already involved in a duel.
Either player is on a duel timeout cooldown.
The two players are not in the same world.
Either player is in the SMP tutorial world.
The challenger is in the Lobby or Spawn.
This keeps duels from being used to bother new players, bypass safe areas, or interrupt players who are already locked into another fight.
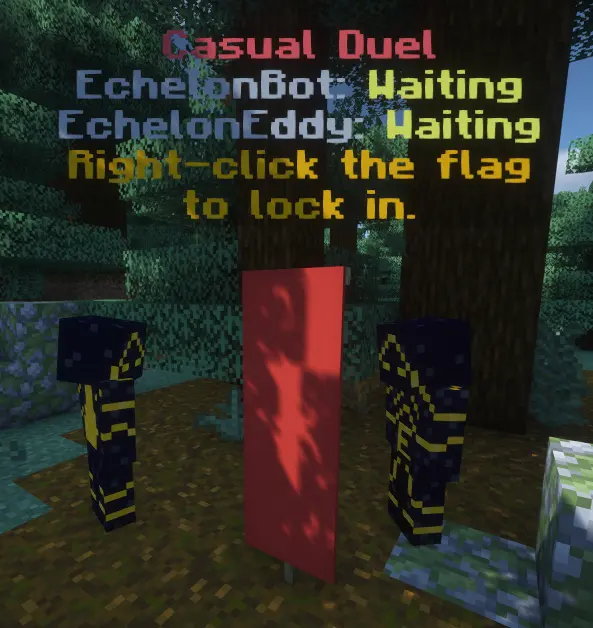
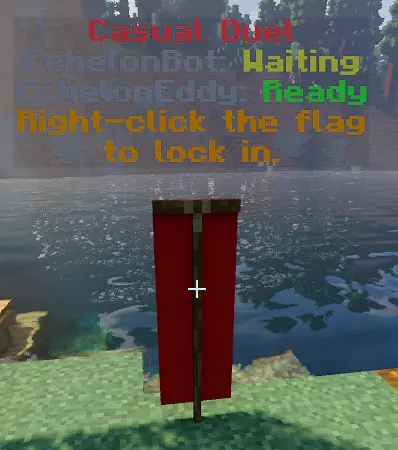
The Duel Flag
When a challenge is created, a duel flag appears between the two players.
The flag drops into place at the midpoint between the challenger and the challenged player. Both players use that flag to ready up.
The challenge starts in the challenge stage. During this stage, the duel is not live yet. Both players must interact with the flag and mark themselves ready before combat begins.
If both players do not ready up in time, the duel request expires. The current challenge timeout is 30 seconds.
When a challenge times out, both duelists receive a short timeout cooldown before another duel can start. The current cooldown is 60 seconds.
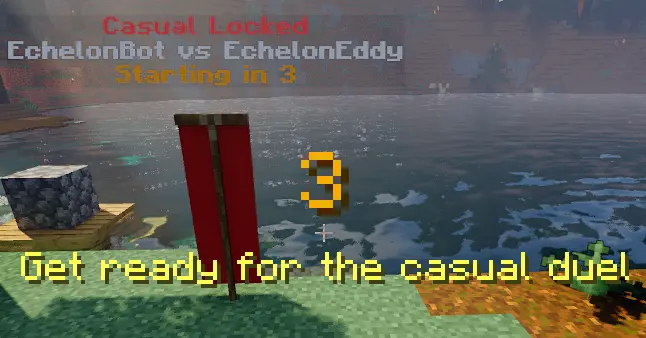
Countdown
Once both players ready up, the duel enters countdown.
The countdown is currently 5 seconds. During this time, the server snapshots both players' loadouts, clears protected outside carryover effects, applies the ranked kit if the duel is ranked, and prepares the fight.
You cannot use commands while inside a duel. You also cannot drop items once the duel is locked in.
Blocks and buckets are blocked during the challenge and countdown stages. This means nobody can start building or setting up before the fight is actually live.
When the countdown ends, the flag is removed and both players see the Fight title.
Ranked Duels
Ranked duels use the ranked iron loadout.
Both players receive the same controlled kit so the fight is based on execution instead of whoever brought the better inventory.
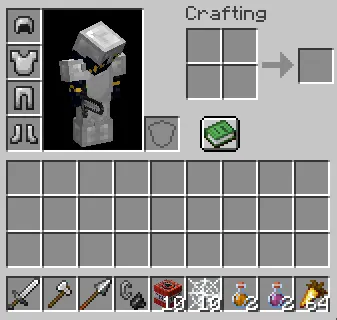
The ranked kit includes:
Iron sword.
Iron axe.
Iron spear.
Flint and steel.
10 TNT.
10 cobwebs.
2 Fire Resistance potions.
2 Regeneration potions.
64 golden carrots.
Full iron armor.
The ranked kit also clears active potion effects, resets health and food, clears fire and freeze state, and puts both players into the same combat starting point.
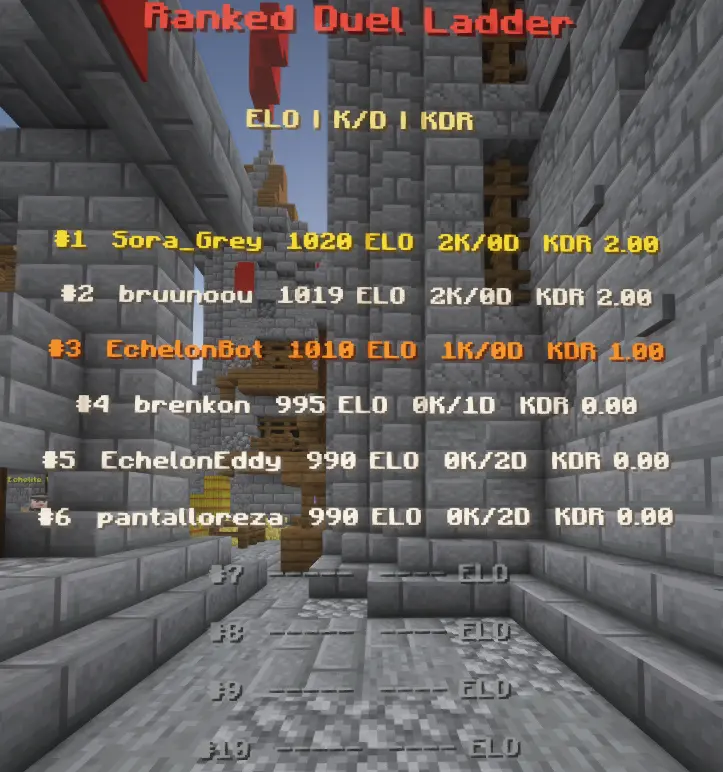
Ranked ELO
Ranked duels affect ELO.
Every ranked player starts from 1,000 ELO. A normal ranked win starts at +10 ELO, and a ranked loss is -5 ELO. ELO cannot fall below 0.
Repeat wins over the same player taper down. If the same player keeps beating the same opponent in repeated ranked fights, the gain can shrink until it reaches +1 ELO.
Ranked stats track:
ELO.
Ranked kills.
Ranked deaths.
Ranked KDR.
The ranked leaderboard sorts by ELO first, then KDR, then kills, then deaths.
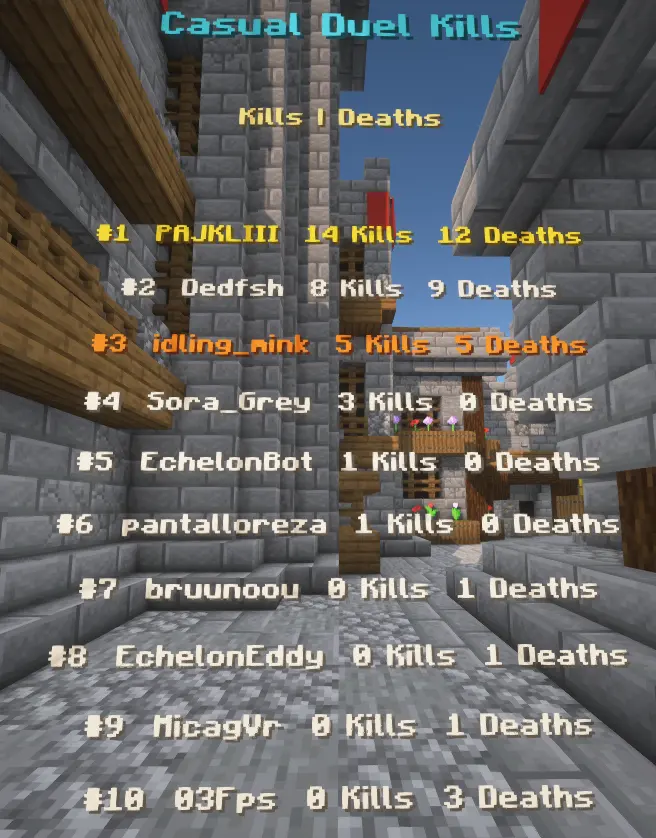
Casual Duels
Casual duels use your current inventory.
This mode is for testing builds, fighting friends, practicing with your own gear, or settling a challenge without touching ranked ELO.
Casual does not gain or lose ELO. It only tracks casual kills and casual deaths.
Because the duel system snapshots and restores player state, casual duels are not designed as a way to steal gear, farm items, or permanently consume another player's inventory. The fight is the point.
If you want a fair standardized match, use Ranked. If you want to fight with whatever you already have, use Casual.
PvP Rules
PvP is duel-only.
The combat gate covers more than just sword hits. The duel system checks player damage, projectiles, tameable attacks, fire caused by another player, splash potions, lingering area effect clouds, TNT, and other player-sourced combat paths.
If two players are not in the same live duel, player-vs-player combat is blocked.
Once a duel is live, damage is allowed only between the two duelists in that same session. Outside players cannot join in, and duelists cannot damage unrelated players through duel combat.
This lets survival stay peaceful unless both players choose to duel.
Terrain Restoration
Duel arenas are temporary.
During an active duel, the system tracks block changes around the fight. Blocks broken, blocks placed, fluid changes, TNT damage, explosions, fire spread, block burn, block fade, block formation, leaves decay, and other environment changes can be captured for restoration.
After the duel closes, the system restores the tracked terrain snapshots.
TNT is also cleaned up. The duel system tracks duel-owned explosives, disarms nearby primed TNT during cleanup, and runs repeated sweeps so chained TNT does not keep damaging the area after the duel is over.
The goal is simple: fight hard, then leave the world the way it was.
Inventories And Drops
The duel system protects player inventories.
When countdown starts, player loadouts are saved. After the duel ends, saved loadouts are restored. If a player disconnects before the restore can run, the restore is queued for when they come back.
Once the duel is locked in, item dropping is blocked. Duel-created drops are tracked and cleaned up so they cannot duplicate when inventories are restored.
The system also watches storage interactions during active duels. It snapshots block inventories, entity inventories, item frames, direct storage blocks, hopper-style movement, pickup events, and other storage paths so duel cleanup can put things back correctly.
Duels are for fighting, not storage tricks.
Outside Effects
Outside effects are not supposed to decide duels.
At countdown start, the duel system clears protected carryover effects from outside beacon, conduit, and guardian sources. This includes external beacon-style potion effects, conduit power, and mining fatigue.
The system also tracks duel-placed beacon and conduit blocks separately. That distinction matters because only effect sources placed during the duel should count as part of that duel.
In plain terms: you should not be able to stand near an outside beacon, conduit, or guardian setup and bring that hidden advantage into a duel.
How Duels End
A duel ends when one player is defeated, when both players are defeated together, or when the session is cancelled.
If one duelist reaches 0 health or dies during the active fight, the other player wins.
If both duelists are marked defeated in the same short resolution window, the duel becomes a draw.
If a player leaves or teleports away, the duel is closed and cleanup runs.
If the server reloads or the plugin disables, active duel sessions are closed safely.
After an active duel finishes, player states are restored, no-damage ticks are applied briefly, terrain cleanup runs, and the final result is sent to the participants.
Duel Feed And Leaderboards
Duel wins can post to the Duel Feed in Discord.
The message is simple and direct: the winner defeated the loser in a duel. This makes wins visible without turning the system into spammy narration.
Duel stats also feed leaderboards.
Ranked leaderboards focus on ELO, KDR, kills, and deaths. Casual leaderboards focus on casual kills and casual deaths.
At spawn, the duel boards show ranked and casual competition separately so players can chase the style of PvP they actually care about.
Quick Summary
The short version is:
Right-click a player with an empty hand to challenge them.
Pick Ranked for the controlled kit and ELO.
Pick Casual for current-inventory fights without ELO.
Both players ready up at the duel flag.
The challenge expires if both players do not ready up in time.
Countdown locks the duel in.
Commands and item dropping are blocked during the locked duel flow.
PvP outside live duels is blocked.
Terrain, inventories, storage, and duel drops are cleaned up afterward.
If you want to fight someone on EchelonMC, duel them properly. If there is no duel, there is no PvP.
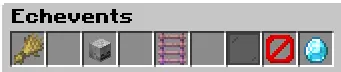
Echevents
Echevents are the special activity hub of EchelonMC.
This is where you go when you want something different from normal survival play. Echevents includes challenge worlds, timed tasks, reward tokens, special perks, and reward packs that feed back into your main survival experience.
The main Echevents options are:
The Great Harvest
Gopher
Parkour
Echevent Rewards
Each one works a little differently, but they all connect back to the same idea. Play events, earn progress, and turn that progress into useful rewards.
Where To Start
To open Echevents, visit the Echevents NPC at spawn.
The Echevents menu is built as a small hub. From there, you can jump into The Great Harvest, start Gopher tasks, enter Parkour, or spend your Echevent Tokens in the Echevent Rewards menu.
If you are new, start by opening the menu once and looking at every option before committing to one. Echevents is not one single minigame. It is a group of systems that all reward different play styles.
If you like farming and progression, start with The Great Harvest.
If you like quick tasks while playing survival, start with Gopher.
If you like movement challenges, start with Parkour.
If you already have tokens, open Echevent Rewards.
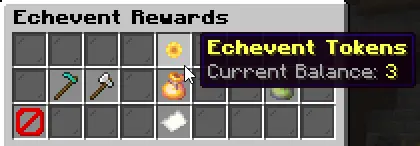
Echevent Tokens
Echevent Tokens are the main reward currency for Echevents.
They are not the same thing as Echelites or Echelars. Echevent Tokens are earned through event systems and spent in the Echevent Rewards menu.
You can earn Echevent Tokens from several places:
Prestiging in The Great Harvest gives +1 Echevent Token.
Completing the full Parkour course gives +1 Echevent Token.
The Gopher Shop sells 1 Echevent Token for 5,000 Gopher Points.
Weekly Weekend Event winners can earn Echevent Tokens as part of their prize.
Once you have tokens, you can spend them on event reward perks or reward packs.
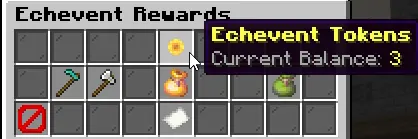
Echevent Rewards
The Echevent Rewards menu is where Echevent Tokens become permanent utility or direct payout packs.
Current rewards include:
Better Harvest costs 1 Echevent Token.
Tree Harvest costs 1 Echevent Token.
Bigger Echelite Pack costs 1 Echevent Token and opens for 1,000 to 50,000 Echelites.
Echelar Pack costs 2 Echevent Tokens and opens for 1 to 3 Echelars.
Better Harvest and Tree Harvest are unlocks that can be toggled on and off after purchase. The packs are one-time items. You buy the pack, receive it in your inventory, then right-click it to open.
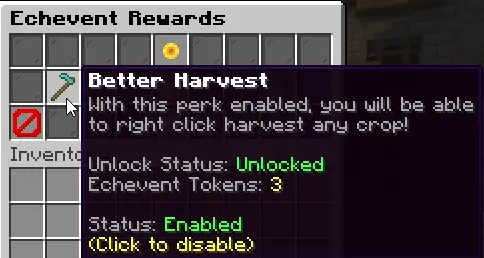
Better Harvest
Better Harvest is a survival-world crop perk.
Once Better Harvest is unlocked and enabled, you can right-click fully grown crops in the main survival worlds to harvest them. The crop resets back to its first growth stage, and the crop drop is placed into the world for you to collect.
This is meant to make normal farming smoother. You do not have to break and replant every crop by hand when the perk is active.
Better Harvest currently works in Echelon and Nether. It must be unlocked from Echevent Rewards and enabled in the menu before it works.
Tree Harvest
Tree Harvest is a survival-world tree cutting perk.
Once Tree Harvest is unlocked and enabled, breaking a naturally spawned tree log with an axe can bring down the rest of the tree from bottom to top.
Tree Harvest has a few important rules:
It only works when using an axe.
It checks for naturally spawned trees.
Player-placed logs are ignored.
Tool durability is applied for the extra logs.
The effect costs 1 hunger when it runs.
Trees larger than the 250-log safety limit are skipped.
This perk is useful for gathering wood without leaving half a tree floating in the air.
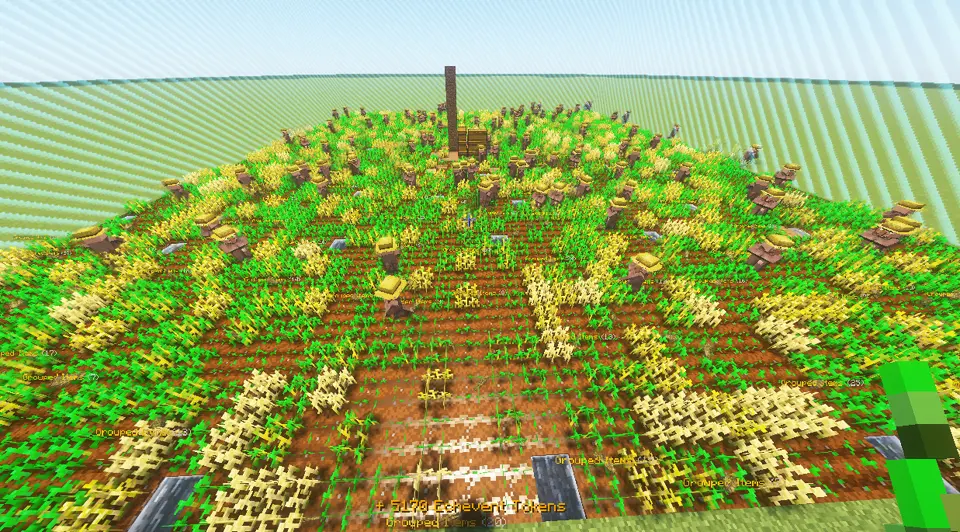
The Great Harvest
The Great Harvest is the farming side of Echevents.
When you enter, you are sent into your own event farming world. Your normal inventory is saved, and the event gives you special tools for that world.
The Great Harvest is built around growing wheat, earning Farmers Coins, buying event upgrades, and eventually prestiging your event world for bigger long-term rewards.
You are given event tools such as:
Event Hoe.
Event Shovel.
Unlimited Wheat Seeds.
Unlimited Bonemeal.
Unlimited Water Bucket.
Unlimited Empty Bucket.
NPC Lead.
These tools are meant for the event world. When you leave, your main inventory is restored.
The Great Harvest Rules
The Great Harvest keeps event progress separate from normal survival.
Inside the event world, commands are disabled except the event confirmation commands and /spawn. Use /spawn whenever you want to leave.
Event items cannot be dropped in normal ways. Ender chests are blocked in the event world, and event inventories are saved separately from your main inventory.
The goal is simple:
Plant wheat.
Grow wheat.
Harvest wheat.
Sell produce.
Buy upgrades.
Fill enough of the map with grown wheat to prestige.
The more you invest into the event, the faster the loop becomes.
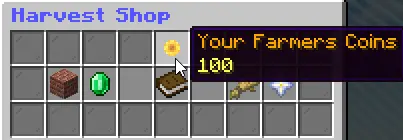
Farmers Coins
Farmers Coins are the activity currency inside The Great Harvest.
You earn Farmers Coins by harvesting wheat in the event world. You can also sell produce directly through the Harvest Shop.
Current produce selling values are:
64 Wheat gives 16 Farmers Coins.
64 Hay Bales gives 144 Farmers Coins.
Farmers Coins are spent inside The Great Harvest. They are used for building blocks, harvest perks, farming upgrades, and repeatable helper purchases.
This currency is not meant to replace Echelites. It is the event progression currency that helps you build up your Great Harvest world.
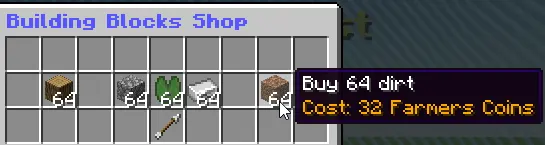
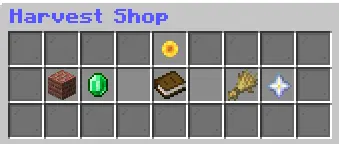
The Harvest Shop
The Harvest Shop gives you several ways to spend Farmers Coins.
The main shop sections are:
Buy Building Blocks.
Buy Harvest Perks.
Harvest Guide.
Sell Produce.
Prestige or Reset World.
Building blocks let you expand and shape your event world. The perk store makes the farming loop faster. The guide explains the shop systems from inside the event.
The Prestige or Reset button is important. Prestige is how you turn enough Great Harvest progress into Echelites, an Echevent Token, and a stronger future run. Full Reset is for players who want to wipe their Great Harvest progress and start over.
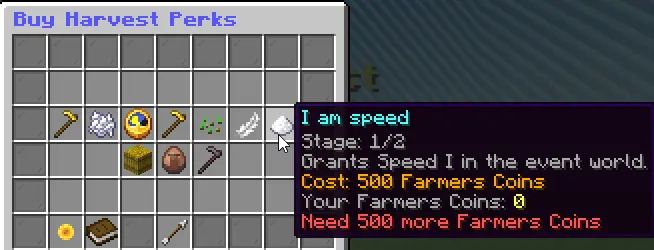
Great Harvest Perks
Great Harvest perks are purchased with Farmers Coins and apply inside The Great Harvest event.
The perk path includes:
Better Harvest: right-click harvest without replacing wheat.
Even Better Harvest: upgrade harvest to a 3x3 area.
Better Bonemealing: grow wheat to full in one click.
Even Better Bonemeal: grow a 3x3 area in one click.
Time Traveler: repeatable growth-speed upgrade, up to level 1,000.
Better Hoe: till a 3x3 area.
Better Seed: plant seeds in a 3x3 area.
Light Footed: prevents crop trampling.
I am speed: grants Speed I in the event world.
I am the Flash: upgrades movement to Speed II.
Condensed Wheat: turns bundled wheat into hay bales.
Farmer Villager: repeatable helper that auto-harvests wheat.
Thor's Hoe: grants flight while holding your Event Hoe.
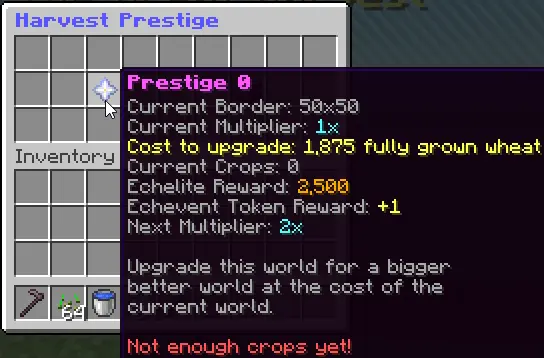
Prestiging The Great Harvest
Prestige is the long-term goal of The Great Harvest.
To prestige, you must fill 75 percent of your current event map with fully grown wheat. Once you meet the requirement, the prestige confirmation shows what you will gain and what will reset.
Prestiging gives:
Echelites based on the next prestige level.
+1 Echevent Token.
A larger harvesting area.
A stronger Farmers Coins multiplier.
The Echelites reward is 2,500 multiplied by the next prestige level. Prestige 1 gives 2,500 Echelites, prestige 2 gives 5,000 Echelites, and so on.
The Farmers Coins multiplier increases with prestige and can reach 10x.
What Prestige Resets
Prestige is powerful because it is a reset.
When you prestige The Great Harvest, your event world is cleared and rebuilt. Your Great Harvest inventory, Farmers Coins, event perks, and current event-world setup are reset so the next run can start clean.
That reset is the tradeoff. You lose the current event setup, but you gain Echelites, an Echevent Token, a larger world, and a better multiplier for future farming.
There is also a Full Progress Reset option. That is much more severe and is meant for players who want to wipe Great Harvest progress completely. Do not use it unless you actually want a fresh start in that event.
Gopher
Gopher is the timed fetch-task side of Echevents.
Open Gopher from the Echevents NPC. From there, you can receive a task, reroll a task, check your current Gopher Points, or open the Gopher Shop.
A Gopher task asks you to bring a specific item within a time limit. The task completes when the item enters your inventory while you are in the Echelon world.
On completion, Gopher consumes one of the required items and pays you Gopher Points.
If the timer expires, the task fails and you can get another one.
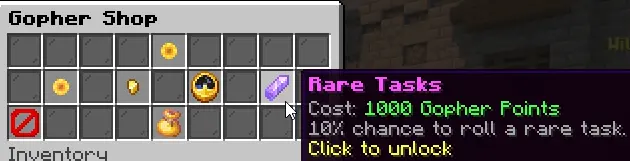
Gopher Tasks
Gopher tasks have normal and rare pools.
Normal tasks can ask for items such as dirt, grass blocks, deepslate, obsidian, diamonds, slime balls, redstone, lanterns, enchanting tables, beacons, ender chests, shulker boxes, tinted glass, blue ice, and more.
Rare tasks unlock through the Gopher Shop. Once unlocked, you have a 10 percent chance to roll from the rare task pool.
Rare tasks can ask for items such as magenta candles, carved pumpkins, lecterns, leads, beacons, elytra, or even a wooden sword.
The reward depends on the task. Simple tasks pay a small amount of Gopher Points. Harder and rare tasks pay much more.
Half Cost Reroll costs 2,500 Gopher Points and reduces rerolls from 25 points to 12 points.
More Time costs 100 Gopher Points and doubles task completion time.
Rare Tasks costs 1,000 Gopher Points and adds a 10 percent chance to roll rare tasks.
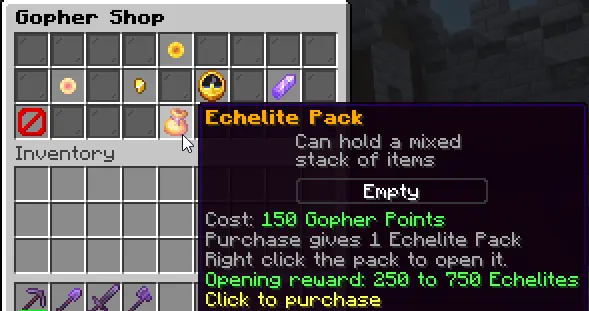
Echelite Pack costs 150 Gopher Points and opens for 250 to 750 Echelites.
Gopher is a good choice if you want Echevents progress while still playing normal survival.
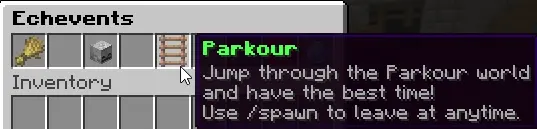
Parkour
Parkour is the movement challenge inside Echevents.
You enter Parkour from the Echevents NPC. When you arrive, the server sends you into the Parkour world and locks the experience down so the course stays fair.
Important Parkour rules:
Use /spawn to leave.
/shownb and /hidenb are allowed for the noticeboard.
Other commands are disabled while inside Parkour.
Ender pearls, chorus fruit, and wind charges are disabled.
Elytras cannot be equipped.
Flight is disabled.
Speed and levitation effects are removed.
Players are kept in Adventure mode.
Parkour is about clean movement, not bringing outside advantages.
Parkour Rewards
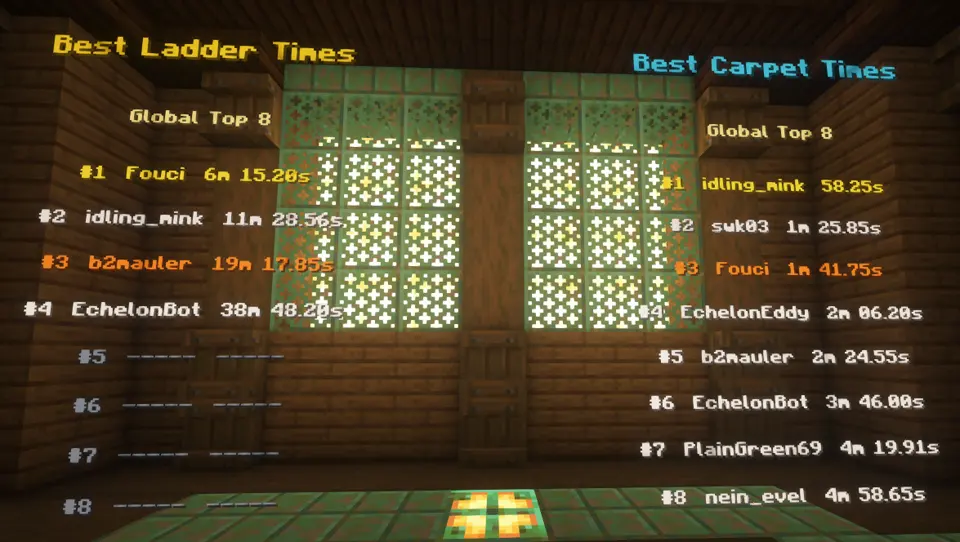
Parkour currently tracks two timed stages:
Carpet.
Ladders.
The timer starts when you begin the Carpet stage. Finishing Carpet starts the Ladders stage. Completing the Ladders stage finishes the full Parkour run.
When you complete the full course, you earn +1 Echevent Token.
Parkour also stores best times and refreshes leaderboards. If you care about speedrunning, Parkour gives you a reason to improve even after you have earned tokens.
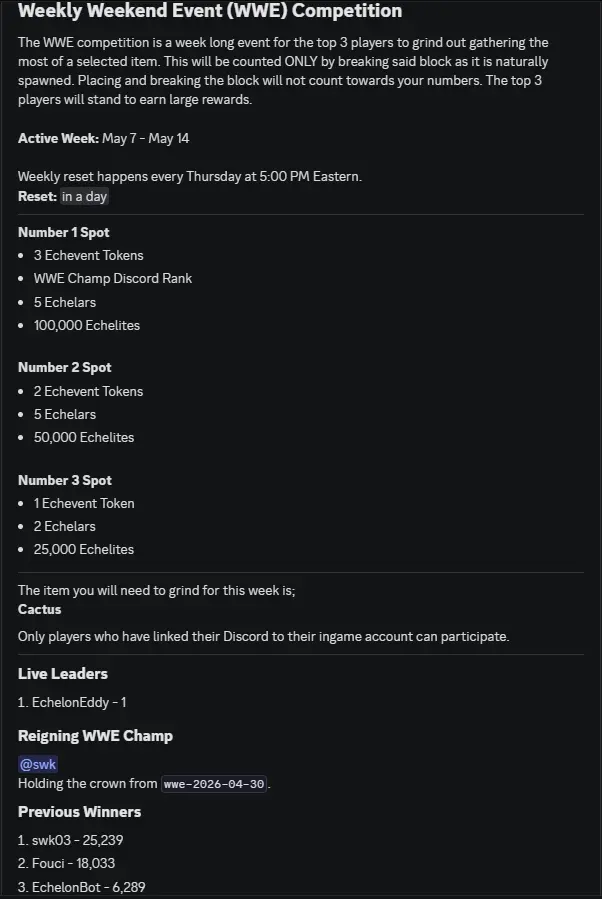
Weekly Weekend Event
Some Echevent rewards also come from the Weekly Weekend Event competition.
The Weekly Weekend Event tracks a selected naturally spawned block target for the week. Only breaking naturally spawned target blocks counts. Placing a block and breaking it does not count.
The top 3 players can earn large rewards when the week ends.
Current top rewards include:
Number 1 Spot: 3 Echevent Tokens, 5 Echelars, 100,000 Echelites, and the weekly Discord rank.
Number 2 Spot: 2 Echevent Tokens, 5 Echelars, and 50,000 Echelites.
Number 3 Spot: 1 Echevent Token, 2 Echelars, and 25,000 Echelites.
Weekly reset happens Thursday at 5:00 PM Eastern.
A Good First Route
If you are brand new to Echevents, the cleanest route is:
Visit the Echevents NPC at spawn.
Try Parkour once so you understand the challenge path.
Pick up a Gopher task before going back into survival.
Enter The Great Harvest when you want a longer event session.
Save Echevent Tokens for Better Harvest or Tree Harvest first if you want long-term survival utility.
Buy packs when you want direct Echelite or Echelar payouts.
Echevents is not something you have to finish in one sitting. It is designed to sit beside normal survival and give you extra goals whenever you want them.
Land Claiming
Land claiming is how you protect the places you care about on EchelonMC.
When you claim a chunk, that area becomes yours. Other players cannot simply walk in and change your build, open protected storage, place homes, break blocks, or use your land like it is public property.
Claims are built around chunks. A chunk is a 16 by 16 section of the world that runs from the bottom of the world to the top. If you are standing in a chunk and use /claim, the claim system works with that chunk.
Land claiming works in the Echelon world and the Echelon Nether. Spawn-protected chunks cannot be claimed.
Getting Started
The main command is /claim.
Using /claim opens the claim menu for the chunk you are standing in. From that menu you can claim or unclaim the current chunk, view borders, see how many chunks you own, open your claimed chunk list, manage default settings, toggle claim flight if you have unlocked it, dispel players from your claims, and see your Echelite balance.
If you want faster commands, you can also use:
/claim quick to claim the chunk you are standing in.
/claim constant to automatically claim new chunks as you move.
/unclaim quick to unclaim the chunk you are standing in.
/unclaim constant to automatically unclaim your chunks as you move.
/claim unclaimall to begin the safety-confirmed flow for removing every chunk you own.
/publics to browse public chunks.
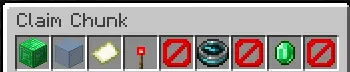
Claim Cost
Claims cost Echelites.
The /claim menu always shows the current cost before you buy the chunk. The price increases as you own more chunks, and the code caps a single chunk purchase at 1,000 Echelites.
The current pricing path is stored with the land claim state, which means the in-game menu is the source you should trust if a price ever changes. The menu also shows the rule for when the next price increase happens.
When you unclaim a chunk, the system refunds the stored purchase value for that claim. If you unclaim everything, the confirmation book shows the total refund before you commit.
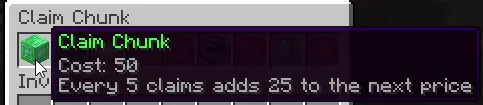
Claim Decay
Claims do not last forever unless you keep them renewed.
When a chunk is first claimed, it receives a default protection timer. The claim menu shows the expiration time, and the Chunk Actions menu has a Claim Decay option.
You can renew one claim, all claims, or the claims inside a bundle.
Renewal costs are:
5 Echelites for 1 day.
25 Echelites for 1 week.
75 Echelites for 1 month.
If a claim expires, it is automatically unclaimed. The claim owner receives the stored purchase refund, but the land becomes unprotected, so renewing is still important.
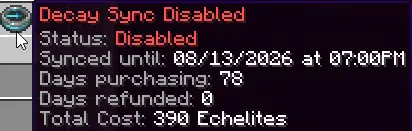
Decay Sync
Decay Sync is for players with many claims.
Instead of renewing chunks one by one, Decay Sync lines your claim expirations up to a shared target date and then charges daily upkeep automatically. The menu shows the math before you enable it, including synced-until date, days being purchased, days being refunded, and the total cost.
If some claims already have more time than the sync target, those extra days count as refund days in the quote. If some claims need more time, those count as purchased days.
Once Decay Sync is enabled, manual renewals are locked until you disable sync. This keeps the math consistent and keeps every synced claim moving together.
Chunk Actions
Every claimed chunk has a Chunk Actions menu.
This is where you manage the chunk after buying it. You can add a name, write a description, set the teleport point, teleport to it, make it public, unclaim it, open decay renewal, and designate trusted players.
Naming and descriptions are useful for large bases because your claim list becomes easier to read. Instead of seeing only chunk coordinates, you can label areas like Storage Hall, Crop Farm, Nether Tunnel, Shop Front, or Main Base.
The teleport point is also important. If you set it carefully, chunk teleports bring you back to the exact safe spot you picked instead of just landing somewhere random in the chunk.
Claim Teleports
Claim teleports are a separate unlock.
To teleport to your claimed chunks, you must unlock chunk teleporting from Echelon Voting for 5 vote points. Once unlocked, the Land Claim system allows owner and team chunk teleports.
Teleporting to one of your own claimed chunks costs 100 Echelites. If the teleport fails, the charge is refunded.
Public chunks work differently. Anyone can browse public chunks with /publics, and teleporting to a public chunk costs 50 Echelites. The owner receives 25 Echelites from that public teleport.
Public chunks also track uses and votes, so good builds can become easy places for other players to find.
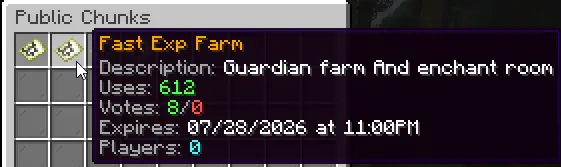
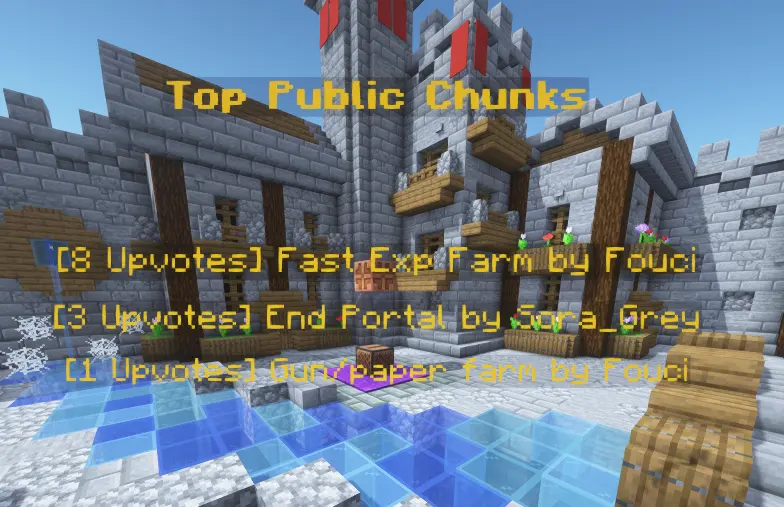
Public Chunks
A public chunk is a claim that the owner has opened for visitors.
When a chunk is public, players can find it in /publics, view its name and owner, teleport to it for the public teleport cost, and vote it up or down.
Public chunks are useful for:
Player shops.
Community farms.
Public builds.
Event areas.
Helpful landmarks.
Shared travel hubs.
You still own the chunk. Public access does not turn it into unclaimed land. It simply makes the chunk discoverable and teleportable through the public chunk browser.
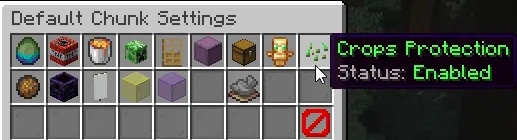
Claim Settings
Claims have a full settings system.
There are default settings for all of your claims, per-chunk overrides for specific claims, and bundle settings for groups of claims.
The settings menu covers:
TNT explosions.
Creeper explosions.
Fluid flow.
Fire spread.
Raids.
Right-click access.
Shulker access.
Chest access.
Pet protection.
Crop protection.
SETHOME access.
Mob spawning controls.
Personal and teammate border colors.
That means a farm claim can behave differently from a storage claim, and a public build can have different rules than your private base.
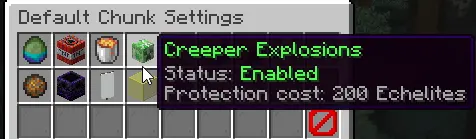
Creeper Protection
Creeper explosions have their own paid protection.
TNT protection is part of the normal claim settings, but disabling creeper explosions has a 200 Echelite cost when it has not already been paid for that setting path.
This matters because creepers are part of normal survival gameplay. If you want your claim to fully block creeper blast damage, use the settings menu and pay the one-time creeper protection cost when the menu asks for it.
Once paid, the menu can keep using that protection without charging every time you view it.
Mob Controls
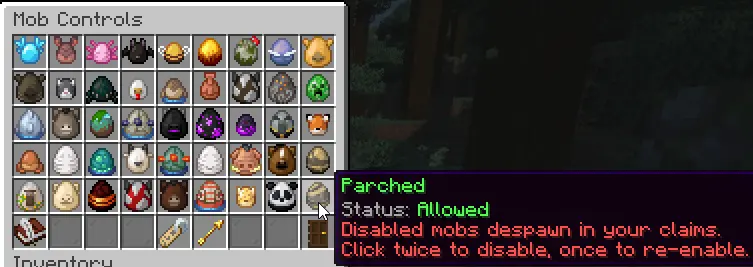
Land claims can block specific mob spawns.
The mob controls menu is built from spawn egg types, so it can cover a wide range of mobs. If you disable a mob in your claimed area, new spawns of that mob are blocked and existing matching mobs inside the claim can be removed.
The system asks for confirmation before disabling a mob because it can affect gameplay inside the claim. This is useful for keeping a base clean, protecting a public area, or controlling what can appear inside a farm or build.
Mob controls can be managed at default, chunk, and bundle levels.
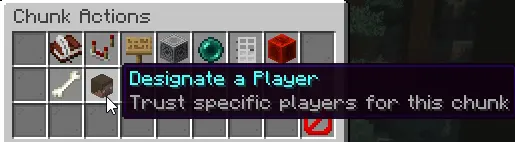
Trusted Players And Teams
Claims are private by default, but they do not have to stay that way.
The Designate a Player menu lets you trust specific players for a chunk. Trusted players can build in that claim without needing ownership.
Teams also matter. If a player is on a team that owns access through the claim owner, the system can treat them as allowed for team-based claim access and teleports.
This gives you three clean layers:
Owner access for your own land.
Trusted player access for specific helpers.
Team access for larger shared bases.
You can remove trusted players later from the same claim management flow.
Claim Bundles
Bundles let you manage multiple chunks as one group.
If your base covers a lot of chunks, you can create a bundle, add chunks to it, rename the bundle, apply bundle settings, manage bundle mob controls, and renew the bundle from the decay menu.
Bundles are useful for large bases because they reduce repeated menu work. Instead of changing the same settings chunk by chunk, you can group related claims and handle them together.
Examples:
Main Base bundle.
Crop Farm bundle.
Storage bundle.
Nether Tunnel bundle.
Public Shop bundle.
If a bundle becomes empty, the system cleans it up.
Claim Borders
Claim borders help you see what is protected.
The /claim menu can turn on visible borders for your owned claims and team-accessible claims. Borders use visible display markers and a 60 second countdown, so you can walk around and understand exactly where your protected space starts and ends.
You can also cycle border colors. There is one color for your own claims and another color for teammate claims.
When you claim a new chunk and persistent borders are not already enabled, the system briefly shows an indicator for that new claim so you can see what you just bought.
Claim Flight
Claim flight is an advanced land claim unlock.
Once you own enough land, the claim menu can unlock flight inside your own or team-owned claims. The current threshold is 100 claimed chunks.
Claim flight is not global flight. It is tied to protected land access. When you leave the valid claim area, the system gives a short grace period, then turns the claim flight state off if you are no longer in an allowed claim.
This makes large bases easier to build while still keeping the benefit tied to land ownership.
Dispel Players
Claim owners can manage players who are inside their claims.
The Dispel Players menu shows players currently inside your claimed chunks. If someone is online, you can send them to spawn. If someone logged out inside your claim, you can queue them to be sent to spawn the next time they join.
This is useful when someone logs out in your base, stands inside a build area, or otherwise ends up in protected land where you do not want them to stay.
Dispel does not delete their items or punish them. It moves them out of your claimed area and back to spawn.
Why Claims Matter
Land claiming is one of the main systems that lets EchelonMC stay long-term.
Claims protect builds from casual damage, control who can interact with storage and blocks, let players organize large bases, create public destinations, and give teams a shared structure for building together.
The best way to use claims is:
Claim the core of your base first.
Open /claim and check your settings.
Set names and teleport points for important chunks.
Renew claims before they expire.
Use bundles once your base grows.
Make only intentional chunks public.
Use trusted players instead of giving everyone access.
If you build something important, claim it before you walk away.
Tool Tips
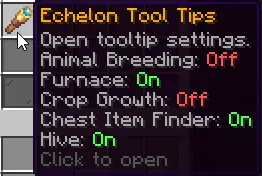
Tool Tips are EchelonMC's in-world information overlays.
Instead of opening a wiki, guessing a timer, or checking a block over and over, Tool Tips show useful information directly above the thing you are looking at.
Tool Tips currently help with:
Animal Breeding.
Furnaces.
Crop Growth.
Chest Item Finder.
Beehives and Bee Nests.
The system is built to be personal. You can decide which tooltip types you want enabled, and your settings do not change them for anyone else.
Where To Find The Settings
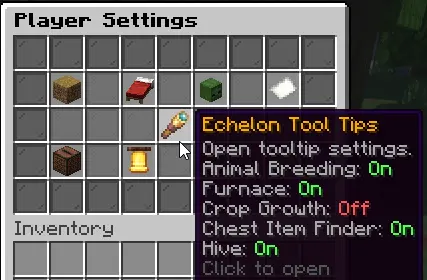
Tool Tips are managed from /toggle.
Open /toggle and choose Echelon Tool Tips. That opens the Tool Tips menu, where each tooltip type has its own on/off setting.
Current settings include:
Animal Breeding Tooltips.
Furnace Tooltips.
Crop Growth Tooltips.
Chest Item Finder.
Hive Tooltips.
Each setting can be changed separately. If you only want crop timers and furnace timers, you can keep those enabled and turn the rest off.
The Echelon Tool Tips Menu
The Echelon Tool Tips menu is the control panel for the feature.
Each button shows whether that tooltip type is currently enabled or disabled. Clicking one opens a confirmation menu before the setting changes.
This matters because Tool Tips are meant to be helpful without being forced. Some players want more information on screen. Some players want a cleaner view. The menu lets you choose what fits your play style.
By default, the tooltip systems are enabled unless you turn them off.
How Tool Tips Appear
Most Tool Tips appear when you look at a supported target.
The default target range is 10 blocks. If the target is inside that range and your setting for that tooltip type is enabled, the server shows a small floating text display above the target.
The overlay updates frequently, with the default refresh interval set to 4 ticks.
Tool Tips are not permanent holograms placed in the world. They are temporary displays shown to the player who is looking at the target.
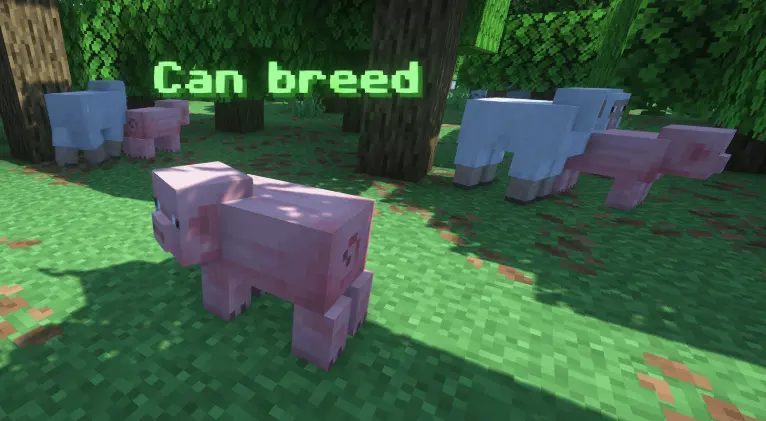
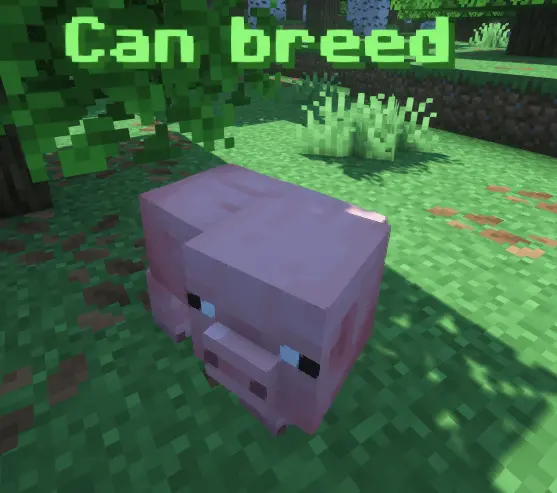
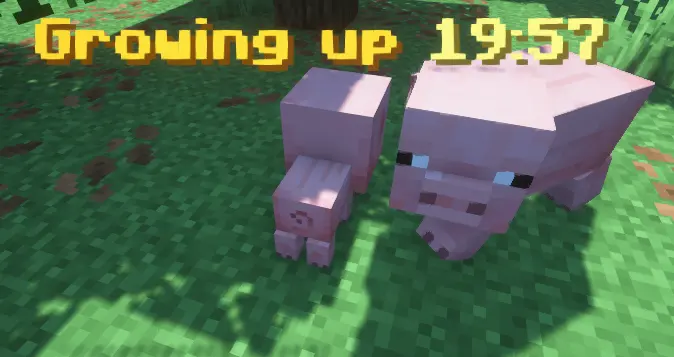
Animal Breeding Tool Tips
Animal Breeding Tool Tips show whether an animal is ready to breed.
When you look at a supported animal, the overlay can show:
Can breed.
Can't breed.
Growing up.
If the animal is a baby and baby growth timers are enabled, the tooltip shows how long is left before that animal grows up.
If the animal is an adult but still on breeding cooldown, the tooltip shows the remaining cooldown timer.
This makes animal pens much easier to manage because you can quickly see which animals are ready without testing each one with food.
Baby Growth Timers
Baby animal Tool Tips are especially useful for farms.
When a baby animal is still growing, the tooltip shows Growing up followed by the remaining time. This lets you know whether the animal is almost ready or still needs a while.
The default settings file has baby growth timers enabled.
If you prefer simpler labels, the server setting can hide the timer and show the normal can't-breed text instead.
Furnace Tool Tips
Furnace Tool Tips show smelting progress above active cooking blocks.
When you look at a supported furnace-type block, the tooltip shows the expected output and the remaining time.
Supported cooking blocks include:
Furnace.
Blast Furnace.
Smoker.
The timer is not just a basic one-item timer. It looks at the input, fuel, current output slot, output stack capacity, and the matching cooking recipe to estimate how much can actually finish.
If the furnace has no valid input, no usable fuel, or nowhere for the output to go, the tooltip will not show.
Furnace Timer Details
The furnace timer is meant to answer one practical question:
How long until this cooking run finishes as far as the current fuel and inventory allow?
For example, if the furnace is cooking iron, the tooltip can show Iron with a timer. If the fuel can only smelt part of the stack, the timer reflects that limited amount. If the output slot is blocked by a different item, the tooltip stays hidden because the furnace cannot complete the recipe cleanly.
This is useful when you have several furnaces running and want to check them quickly without opening every inventory.
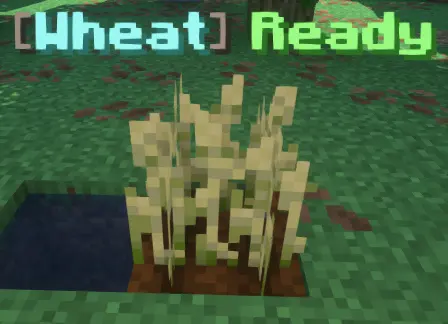
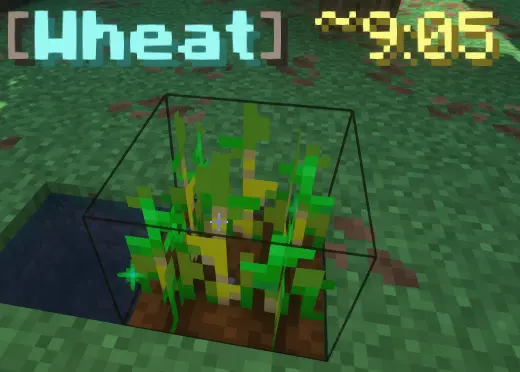
Crop Growth Tool Tips
Crop Growth Tool Tips show the growth state of supported crops.
When a crop is fully grown, the tooltip shows Ready.
When a crop is still growing, the tooltip shows an estimated time, marked with a ~ symbol because natural crop growth is random.
If the crop cannot currently grow, the tooltip can show Stalled.
Supported crops include:
Wheat.
Carrots.
Potatoes.
Beetroots.
Torchflower.
Nether Wart.
Cocoa.
Crop Timer Details
Crop timers use the actual growth conditions around the crop.
For farmland crops, the system checks whether the crop has enough light and is planted on farmland. It also considers crop type, random tick speed, and farmland moisture.
Nether Wart and Cocoa use their own growth logic.
If the crop is missing a required condition, such as enough light, the tooltip can show Stalled instead of a timer.
Because Minecraft crop growth is random, the timer is an estimate. It is there to help you understand the rough wait, not to promise an exact second.
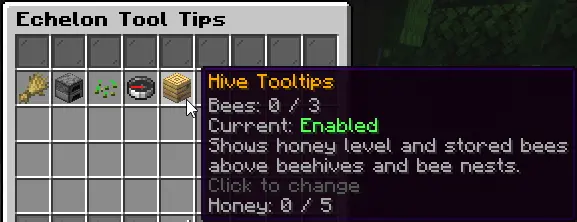
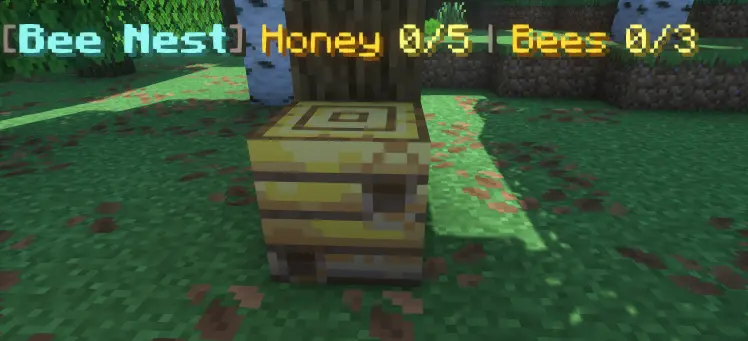
Hive Tool Tips
Hive Tool Tips work on Beehives and Bee Nests.
When you look at a hive or nest, the tooltip shows:
Honey level.
Stored bees.
The honey value is shown as current honey over maximum honey. The bee value is shown as current stored bees over maximum stored bees.
This makes it much easier to know whether a hive is ready to harvest and whether bees are currently inside.
Chest Item Finder
Chest Item Finder is the biggest Tool Tips utility.
When it is enabled, hold an item in your main hand or offhand. The server scans your tracked storage and highlights nearby matching storage with a white outline.
The goal is simple:
Hold the item you are looking for.
Look around your storage area.
Matching containers light up.
This helps you find where you stored an item without opening every chest, barrel, or shulker one by one.
What Storage Can Be Found
Chest Item Finder tracks storage that was placed by players.
Trackable storage includes:
Chests.
Trapped Chests.
Barrels.
Ender Chests.
Placed Shulker Boxes.
The finder checks storage owned by you. It can also check storage owned through your team, so team storage can be highlighted when your team has access.
For Ender Chests, the system checks your own Ender Chest inventory. If your Ender Chest contains the held item, nearby Ender Chests can be highlighted for you.
How Item Matching Works
Chest Item Finder compares the item you are holding against stored items.
For simple items, the type is usually enough. If you hold cobblestone, it looks for cobblestone.
For special items, the match becomes stricter. Items with custom names, lore, enchantments, custom model data, or plugin data need to match more exactly.
Some item families also use stricter matching, such as potions, books, maps, banners, firework stars, and firework rockets.
This helps avoid false matches when two items share the same base material but are not really the same item.
Shulker Boxes Inside Storage
Chest Item Finder can also look inside shulker boxes stored inside other containers.
This is important because many players use shulkers inside chests as their real storage system.
The finder searches nested shulker contents up to a limited depth, so it can still find items that are packed away instead of directly sitting in the chest inventory.
The feature is built for practical storage searching, not just surface-level chest contents.
Search Limits
Chest Item Finder has limits so it stays responsive.
It scans nearby tracked storage in your current world. The search distance is based on server view distance, with a minimum scan radius of 16 blocks.
The scan checks the nearest tracked storage first, up to 96 candidates at a time.
If many containers match, it highlights up to 16 of them.
The scan updates about every half second while you are holding an item, so changing the held item changes what gets highlighted.
Why Tool Tips Are Useful
Tool Tips are small, but they save a lot of repeated checking.
They help you answer questions like:
Can this animal breed yet?
How long until this furnace run is done?
Is this crop ready?
Why is this crop not growing?
How much honey is in this hive?
Where did I store this item?
That means less menu opening, less guessing, and less wasted time while still keeping the normal Minecraft world in front of you.
A Good First Setup
If you are new, a good starting setup is to leave all Tool Tips enabled for a while.
Use Animal Breeding Tool Tips when building farms.
Use Furnace Tool Tips when running smelting rooms.
Use Crop Growth Tool Tips when setting up fields.
Use Hive Tool Tips when working with bees.
Use Chest Item Finder when organizing storage.
After you know which ones you personally use, open /toggle and turn off anything you do not want on your screen.
And More!
EchelonMC has a lot of smaller systems that do not always need a full guide on their own.
Some features are big enough to get their own post, like currencies, land claiming, dueling, Echevents, and Tool Tips. This post is for everything else you will run into while playing.
Think of this as the quick tour.
You will find commands, menus, travel tools, pets, voting, markets, team features, chat features, feedback tools, and small quality-of-life systems that make the server easier to use.
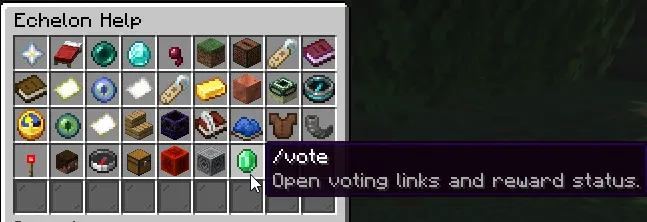
/help
The easiest place to start is /help.
The help menu gathers the most useful player commands into one chest-style menu. Instead of memorizing every command, you can open the menu and click the command you need.
It includes common tools like:
/spawn.
/home.
/sethome.
/rtp.
/back.
/vote.
/teams.
/teamchat.
/trade.
/pets.
/toggle.
/suggest.
/bug.
/updates.
If you are ever unsure what the server offers, open /help first.
Spawn And Getting Around
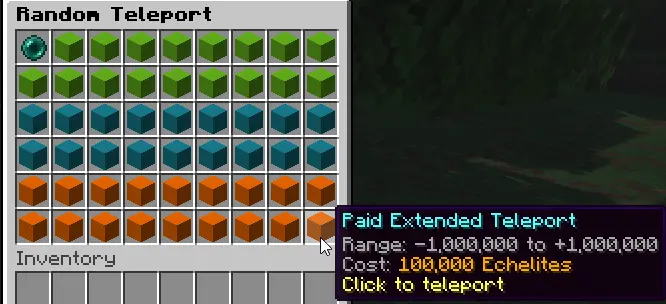
/spawn takes you back to the lobby spawn.
/rtp opens the random teleport menu. You can use it nearby for free, or pay Echelites to search farther away. The current setup starts with a free 1,000 block radius and can scale up to 1,000,000 blocks, with the paid range costing 100 Echelites per thousand blocks.
/back returns you to your previous teleport location when the server has one saved for you.
These commands make exploration less punishing. You can get out into the world, return to important spots, and recover from most travel mistakes without needing staff help.
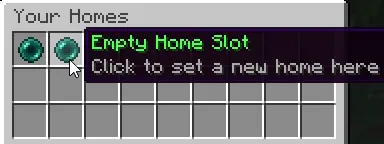
Homes
Homes let you save important places and come back later.
Use /sethome <name> to save your current location. Use /home <name> to return to it.
Homes are meant for places you visit often:
Main base.
Storage room.
Farm.
Shop area.
Friend's base.
Travel hub.
Home slots are unlocked through the Echelite Store, so new players can start simple and expand as they play.
Graves
When you die, a grave protects your items for a limited time.
Current graves last 6 hours. The first few minutes are private to the player who died, then the grave can become public if it is not recovered.
Graves are meant to soften death without removing the danger of survival. You still need to return to your death location, but your items are not instantly scattered everywhere or lost to despawn.
The server also has grave messages, sounds, particles, and a clear recovery flow so you can tell when a grave was created and when it was looted.
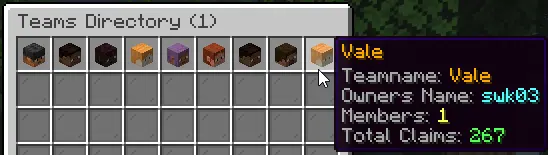
Teams
Teams are for players who want to build and play together.
Use /teams to create, manage, invite, accept, and leave teams. Team menus handle most of the flow, so you do not need to remember every subcommand.
Teams can also connect into other systems. Team chat lets members talk privately, and some protected systems can recognize team access so shared bases are easier to manage.
Use /teamchat to toggle team-only chat. When enabled, your chat messages go to your teammates instead of the whole server.
Public Builds
Some claimed chunks can be made public.
Public chunks appear in /publics, where players can browse, visit, and vote on them. This is useful for places that are meant to be seen by the whole server.
Good public chunks might include:
Player shops.
Community farms.
Build showcases.
Useful travel spots.
Event builds.
Town areas.
The chunk still belongs to its owner. Public access just makes it easier for other players to find and visit.
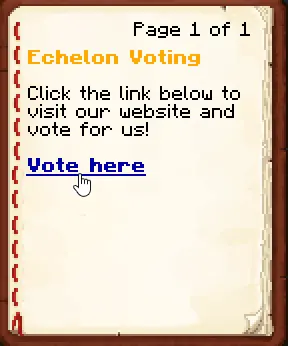
Voting
Voting helps the server grow and gives players useful rewards.
Use /vote to open the voting flow. EchelonMC currently supports 6 vote sites, and each site gives vote points when completed.
Vote Party milestones also reward the whole server. As votes build up, the server can trigger bonuses such as boosted block rewards, boosted place rewards, Echelite Packs, and the Vote Boss.
The Vote Boss is a server-wide target that can spawn from voting progress. Players can join in, fight it, and earn rewards when it goes down.
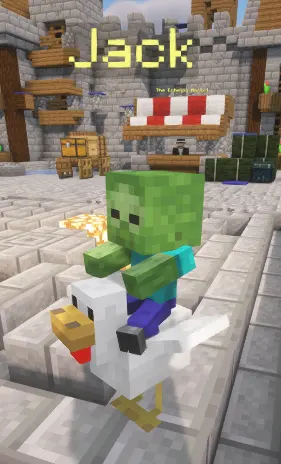
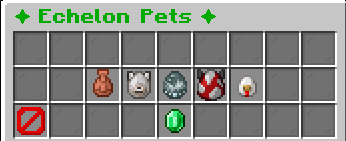
Pets
/pets opens the Echelon pets menu.
Pets are cosmetic companions. They are meant to be fun, visible, and collectible without giving gameplay power.
Current pet examples include Ronnie, Susie, Ralph, Jack, and Top Dog. Ronnie is free, and some pets are tied to Echelar costs or special status.
Pets are a good way to add personality to your character without changing combat, farming, claims, or economy balance.
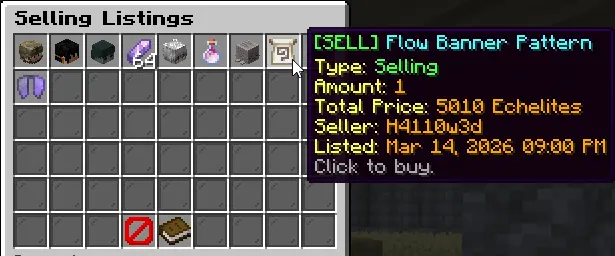
The Echelon Market
The Echelon Market is where players can list items for other players to buy.
It is built for player-to-player selling. If you have extra items, rare drops, useful gear, farm materials, or special collectibles, the market gives you a place to sell them without needing to be online at the same time as the buyer.
The market supports unlimited listings, and listing tax scales by item age. Fresh items cost more to list, while older items are cheaper.
That means the market rewards active selling while still letting older items stay affordable to move.
Player Trading
/trade lets two players trade directly.
Send a trade request with /trade <player>. The other player can accept or deny it. Once accepted, both players use a trade GUI to place items, review the offer, and lock in.
The trade only finishes when both sides confirm.
This is useful for direct swaps, private deals, gifts, rare items, or trades that do not belong on the market.
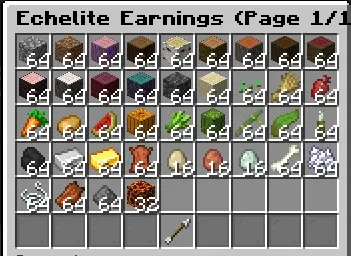
Echelite Trader And Useful Shop Items
The Echelite Trader is one of the main economy NPCs.
The trader has a chest-style interface for buying and selling. Some trade demand rotates over time, so the items the trader wants can change.
The wider store ecosystem also includes useful unlocks and special items such as extra home space, Echelite Packs, Echelon Boxes, Bagalons, Sell Wands, and other quality-of-life rewards.
If you have Echelites and are not sure what to spend them on, the trader and store menus are worth checking first.
Perks
/perks opens your Echelon advancement and perk progress.
Perks are long-term goals and rewards. They give players something to keep working toward beyond a single build, farm, or gear set.
Use the menu to see what you have unlocked, what you are still working on, and what rewards are connected to your progress.
This is one of the best menus to check when you want a new goal but do not know what to do next.
Chat, Names, And Item Linking
EchelonMC has several chat tools.
/formatinfo gives a written guide for color and formatting options.
/emoji gives a written list of the loaded emoji tokens.
/item links the item you are holding into chat so other players can inspect the item details from your message.
/nick lets eligible players set or clear their display name.
/seen lets you check when a player was last online.
These are small features, but they make trading, showing items, decorating messages, and recognizing players much easier.
Discord And Server Feedback
EchelonMC has several ways to connect the server with the community.
/discord opens the official Discord invite prompt.
/linkdiscord links your Minecraft account to Discord.
/suggest opens a writable book for improvement ideas.
/bug opens a writable book for bug reports.
/updates lets you read recent server update notes in-game.
These commands are there so feedback, fixes, and update information do not get lost in normal chat.
Noticeboard And Personal Toggles
The noticeboard is a small information overlay that can show useful server notices.
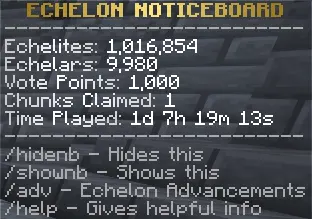
Use /hidenb to hide it and /shownb to bring it back.
/toggle opens your personal settings menu. This is where you can control things like Tool Tips, Did You Know tips, message preferences, and other personal options as they are added.
These settings are player-specific. Turning something off for yourself does not change it for anyone else.
Small Quality-Of-Life Features
Some EchelonMC features are quiet on purpose.
You may notice faster leaf decay, sleep and daylight handling, sitting with /sit, AFK status with /afk, better lead handling through teleports, anti-xray protection, and chat safety features running in the background.
These are not always flashy, but they make the server feel smoother.
The goal is for the server to keep normal Minecraft survival intact while removing the small annoyances that slow players down.
Why This Matters
The big systems give EchelonMC structure.
The smaller systems make the day-to-day play feel complete.
Use /help when you need a command.
Use /toggle when you want to control your own experience.
Use /vote when you want rewards and server-wide progress.
Use /teams when you want to play with others.
Use /trade or the market when you want to work with the economy.
Use /suggest and /bug when something should be added, changed, or fixed.
There is a lot here, and more will continue to be added over time.


-960.webp)
-960.webp)

-960.webp)
-960.webp)


-960.webp)

-960.webp)
-960.webp)
-960.webp)
-960.webp)


-960.webp)


-960.webp)
-960.webp)

-960.webp)